前段时间做项目,编制一个文件需要确定压力管道等级。虽然按照规范标准一步一步判断就能搞定,但文字条目查起来总是很费眼。所以就想按照规定绘制一张判断过程的流程图,以后再进行此类工作就按照图中步骤判断,省心省力。
之所以用plantUML,主要原因是想装装逼格,像个geeker一样用文本画图。后来在试用中发现,这样写图真心比用绘图软件画图省时间,而且还是在初学plantUML不熟悉语法的情况下。
看标准规范,总结了下压力管道等级判断主要分为两大工序:
1. 先判断管道是否为压力管道;
2. 如果是压力管道,再确定其等级。
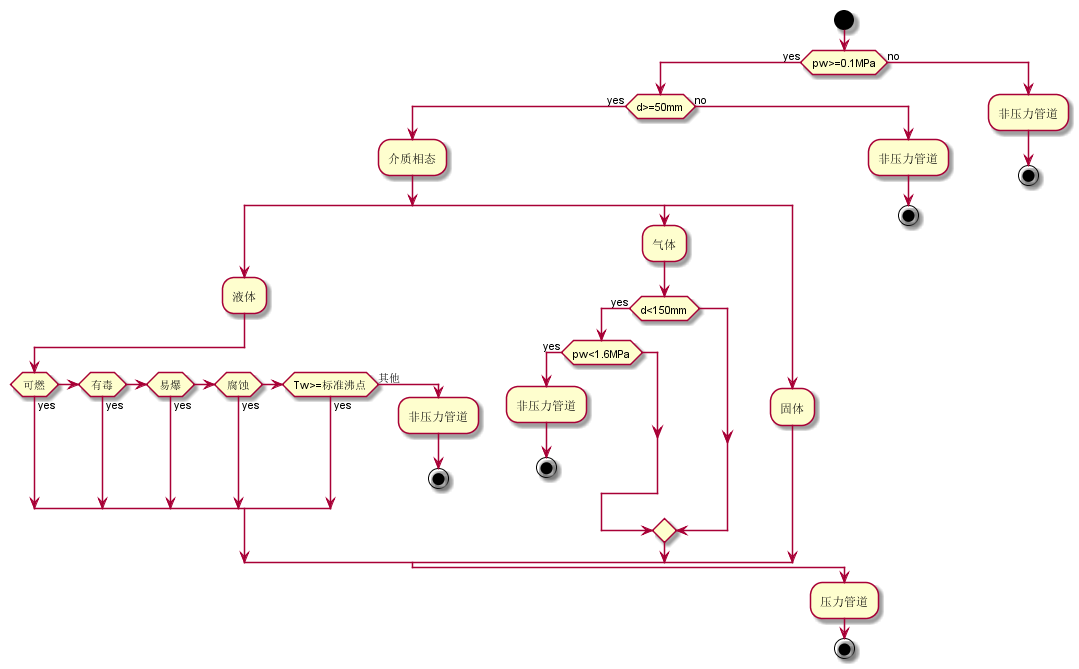
- 是否压力管道判断
是否压力管道判断流程图如下:
plantUML代码:
 1
 2
 3
 4
 5
 6
 7
 8
 9
10
11
12
13
14
15
16
17
18
19
20
21
22
23
24
25
26
27
28
29
30
31
32
33
34
35
36
37
38
| @startuml
start
if (pw>=0.1MPa) then (yes)
if (d>=50mm) then (yes)
:介质相态;
split
:液体;
if (可燃) then (yes)
elseif (有毒) then (yes)
elseif (易爆) then (yes)
elseif (腐蚀) then (yes)
elseif (Tw>=标准沸点) then (yes)
else (其他)
:非压力管道;
stop
endif
split again
:气体;
if (d<150mm) then (yes)
if (pw<1.6MPa) then (yes)
:非压力管道;
stop
endif
endif
split again
:固体;
end split
else (no)
:非压力管道;
stop
endif
else (no)
:非压力管道;
stop
endif
:压力管道;
stop
@enduml
|
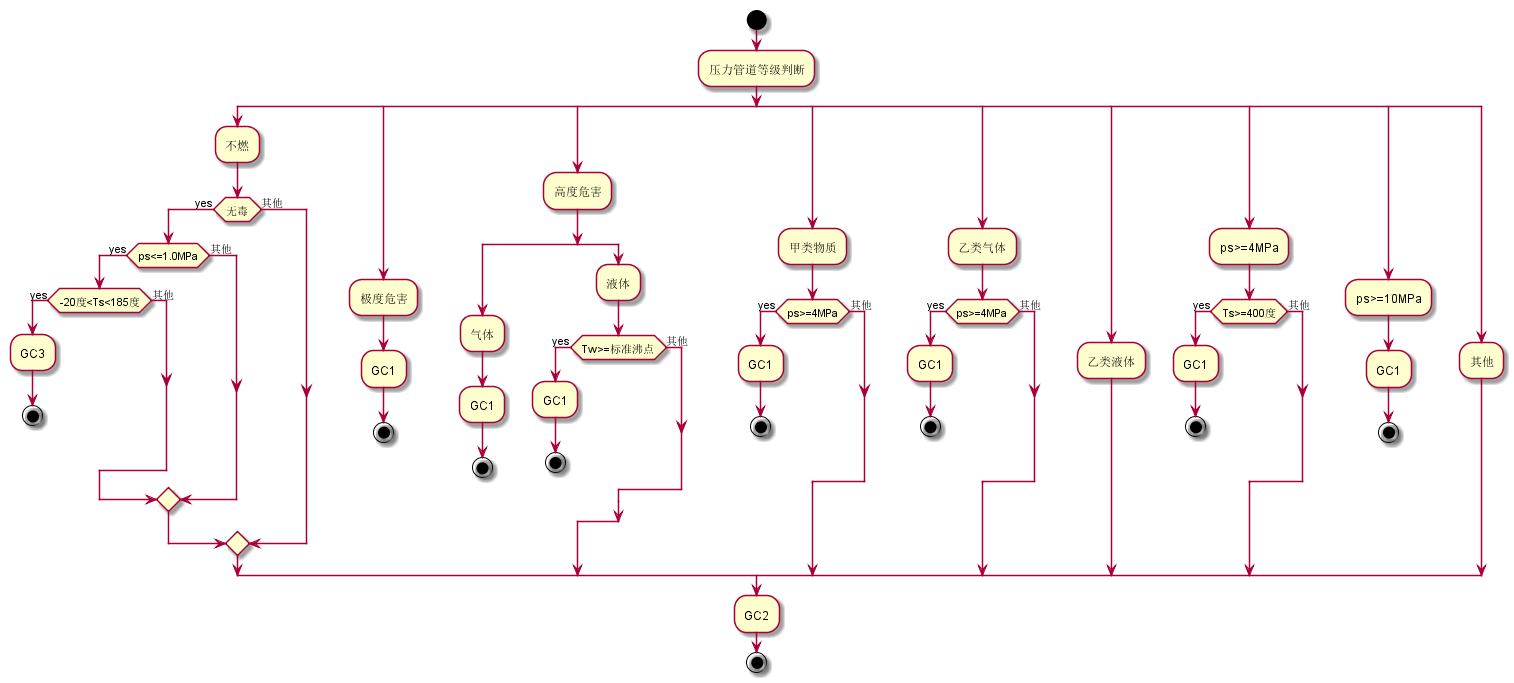
- 压力管道等级确定
压力管道等级判断流程图:
plantUML代码:
 1
 2
 3
 4
 5
 6
 7
 8
 9
10
11
12
13
14
15
16
17
18
19
20
21
22
23
24
25
26
27
28
29
30
31
32
33
34
35
36
37
38
39
40
41
42
43
44
45
46
47
48
49
50
51
52
53
54
55
56
57
58
59
60
61
62
63
64
65
66
67
| @startuml
start
:压力管道等级判断;
split
:不燃;
if (无毒) then (yes)
if (ps<=1.0MPa) then (yes)
if (-20度<Ts<185度) then (yes)
:GC3;
stop
else (其他)
endif
else (其他)
endif
else (其他)
endif
split again
:极度危害;
:GC1;
stop
split again
:高度危害;
split
:气体;
:GC1;
stop
split again
:液体;
if (Tw>=标准沸点) then (yes)
:GC1;
stop
else (其他)
endif
end split
split again
:甲类物质;
if (ps>=4MPa) then (yes)
:GC1;
stop
else (其他)
endif
split again
:乙类气体;
if (ps>=4MPa) then (yes)
:GC1;
stop
else (其他)
endif
split again
:乙类液体;
split again
:ps>=4MPa;
if (Ts>=400度) then (yes)
:GC1;
stop
else (其他)
endif
split again
:ps>=10MPa;
:GC1;
stop
split again
:其他;
end split
:GC2;
stop
@enduml
|
用了plantUML的新活动图语法,还处在beta版中,所以生成的图像中节点和连线的布局还有待提高,不过作为自己工作用工具图,这种美观程度也够了。